Show What You Know: Reviewing and Applying Knowledge with Debugging Activities

Toni and I led a number of 4-day Teaching Computer Science with TI-Nspire Technology workshops across the state of Texas this summer. Many of the sites offered days 1 and 2 consecutively, followed by days 3 and 4 at a later date. Sometimes day 3 of the PD happened months after day 2. In these instances, how might we structure an activity that helps participant review key computer science ideas from previous learning episodes, while also applying these ideas in new situations? One strategy that we found particularly helpful in this situation was a set of debugging activities.

Side note #1: The first two days of learning delved into most of the topics from the first four units of the 10 Minutes of Code activities, including user input (via parameters or Request statements), output (Disp, Text), variables, data types, conditionals (If, If…Else), and loops (For, While, and DoWhile). Additionally, we applied many of these same concepts to tasks with the Innovator through the first two units of the 10 Minutes of Code for the TI-Innovator Hub activities.

Side note #2: Our use of debugging activities was inspired by the work of Amin Lalani & Georgia Stuart at UT Dallas.

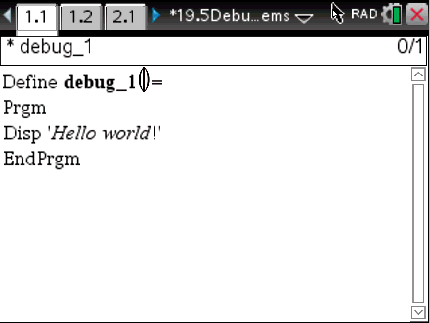
We started Day 3 with a Debugging Problems TNS file. The file was composed of 10 Problems. Each Problem contains a Program Editor page, like this one:

with a corresponding Calculator page, like this one, on which to run/execute the program:

Each program (named debug_1, debug_2, etc.) contained at least one error. Participants worked in pairs to debug/fix each program. In so doing, participants reviewed, applied, and discussed:

  • How to compile a program in the Program Editor (using Check Syntax & Store)
  • How to run/execute a program in a Calculator page (including the use of the var button to summon program names)
  • Syntax for the TI-Nspire programming language
  • Variable naming conventions
  • Data type considerations (including concatenation)
  • Control structures, including conditional statements and loops
  • Logic and conditional statements
  • User input mechanisms (including parameters and Request statements)
  • Error types (including compilation errors & execution errors) and error messages
  • …and more!

Some of the programs involved minor errors. For example, the debug_1 program shown above—participants determined that the string in the Disp statement should have been in double quotes (“) and not single quotes (‘). Here’s a quick GIF of troubleshooting this program:

Debug_1

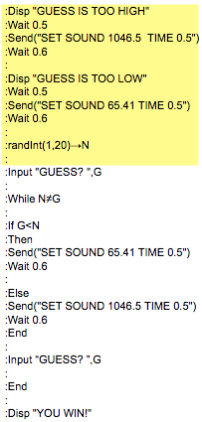
Here are two other programs from the TNS file. What errors do you see? How might we debug these programs? What important CS topics connect to these errors and/or fixes?

It was incredibly valuable for participants to troubleshoot and debug these programs dynamically on the handheld calculators. They could fix errors as they found them and then compile and execute the edited program right away to test their “fixes”. On numerous occasions participants fixed one or more parts of the program, but then discovered another error when they ran the edited program.

Our brains often “fix the code for us,” helping us read the intention of the code, but perhaps missing some of the subtle errors specific to the coding language. This activity helped us review and apply programming skills specific to the TI-Nspire language, while also discussing larger computer science topics and content applicable across languages.

Additionally, we experienced the cognitive difference between writing a program from scratch and debugging an already written program. It feels different to debug–to find and correct errors in already written code–than to “code from scratch”; there was important learning to be had in this space.

Give it a try yourself! Here’s a copy of the TNS file with all 10 debugging programs in it. Each program does not necessarily have a unique solution—there may well be more than one way to “fix” the program so that it runs as intended, but with different code structures under the hood.

Also, Toni and I wonder…what would similar debugging programs look like that included TI-Innovator commands/components? What sort of errors would be helpful for learners to confront, discuss, and debug in regards to Innovator programs?

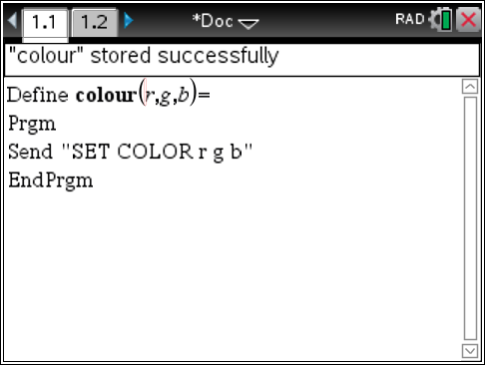
Here are some rough draft ideas for possible Innovator debug programs:

What other programs and/or lines of code might be valuable to include in a set of TI-Innovator debugging problems?

What other value do these debugging activities bring to the learning experience?

Foldables in Computer Science: Consolidating Our Learning

How might we help learners synthesize important computer science topics (including vocabulary, structures, and techniques) using Foldables? How might these three-dimensional graphic organizers help learners consolidate their learning, while also providing effective notes for later reference?

In designing learning experiences for new-to-CS educators, Toni and I considered how Foldables might dovetail nicely with the 10 Minutes of Code activities provided by Texas Instruments. The 10 Minutes of Code activities do a phenomenal job of crafting short learning episodes that provide students with bite-sized instructional episodes (see the Skill Builders) followed by opportunities to apply their new learning (see the Applications).

Toni and I wanted to build on these 10 Minutes of Code activities by layering additional content connections that deliberately drew out and discussed some of the computer science topics that are operating within the 10 Minutes of Code activities. Specifically, we were working to develop Foldables that formalized CS topics that were important for a beginning teacher of CS to know (as defined by the TExES Computer Science 8-12 certification requirements in Texas).

Our Foldable work is inspired by the top-notch work of Dinah Zike and her crew from Comfort, Texas. If you are new to the world of Foldables, be sure to check out Dinah’s site. Dinah has a ton of resources that support Foldable use and creation in all grade levels and subject areas. Here are some of my favourites: Notebook Foldables, Big Book of Math for MS and HS, and her Notebooking Central resources for Math.

Toni and I wondered: What would Foldables look like in computer science? This led us on a fun journey…! Here are some of the highlights.

Here is a Three-Tab Foldable that overviews introductory Program Protocols, including how to Create (using the Program Editor), Compile (using the Check Syntax & Store command), and Run (using a Calculator page) a program on the TI-Nspire handheld. These ideas connect to the work done in the Unit 1: Program Basics—Skill Builder 1: Introducing the Program Editor 10 Minutes of Code activity.


Here’s another example of a Foldable that uses a screenshot of a program and its output for a given set of actual parameters. This Shutterfold Foldable (with an inlaid screenshot) was used to annotate some details about Formal and Actual Parameters after we wrote our first program that used parameters (in the Unit 1: Program Basics—Skill Builder 2: Arguments & Expressions 10 Minutes of Code activity).


Here’s one of my favourites: a Matchbook Foldable that outlines how a For Loop operates. We used this Foldable to identify the four parts of a For loop, as well to practice tracing out a loop using a table. Notice the inclusion and annotation of a screenshot of the program. This Foldable formalized ideas from the Unit 4: Loops—Skill Builder 1: For Loops 10 Minutes of Code activity.


Here’s an awesome tweet from a learner in one of Toni’s workshops and his work with this exact Foldable! Love it!

We created similar Matchbook Foldables for While Loops and Do While Loops, but then also created this Three-Tab Foldable to compare and contrast the three types of loops (For, While, and Do While). This Foldable helped learners step back and consider the important similarities and differences across the three loop types that were studied throughout the Unit 4: Loops 10 Minutes of Code activities.

Here’s an example of using a Shutterfold Foldable to document and analyze two Computer Science techniques (specifically, using Counters and Accumulators). This builds on the ideas used in the Unit 4: Loops—Application: Bank Notices 10 Minutes of Code activity. Consider how a Foldable like this serves as a way to consolidate new information, but also as a helpful resource for later reference and use.


We have received really positive feedback about how these Foldables helped learners step back from the coding experiences and synthesize the ideas they were learning about and experimenting with in a meaningful way. The Foldables helped to organize and chunk the main ideas and were also really handy for revisiting ideas throughout the learning episodes.

The examples above are a sampling of the Foldables that Toni and I have created for formalizing CS topics. We love doing this work!

What other topics from computer science might be a good fit for Foldables? What other strategies might be effective for creating powerful Foldables for CS topics? How might Foldables dovetail into work with the TI-Innovator Hub and those 10 Minutes of Code activities?

“Cooking Show” CS Lessons / Presentations

What do you do if there isn’t quite enough time in a CS lesson or a CS conference session? What “cuts” do you make and why? What do you focus on and/or highlight? What do you downplay and/or skip? Would your decisions be different if the activity was for new-to-CS learners or experienced CS learners?

This is a dilemma Toni and I have faced on a number of occasions. One approach that we have found particularly helpful for these situations is what we call “Cooking Show CS”.

Consider a cooking show for a minute… Time is not spent equally on each part of the cooking experience. Rather, some parts—the really important parts—are slowed down and discussed and modeled in great detail. Other parts—the not-so-important parts—are sped up considerably or even skipped entirely. Like, seriously, when does a cooking show include “real-time footage” of a recipe baking second-by-second in the oven?? We don’t need to see that—we get it. We often do need to see the preparation and the active cooking and the tips and tricks and the cooking “theory” being applied to this particular recipe. So that’s where a cooking show spends its time.

What would the CS equivalent of this be? What would it look like for a CS “recipe”/program/project to slow down and focus deeply on the preparation and the active computational thinking and the tips and tricks and the computer science theory…while speeding up or skipping entirely the parts that we don’t need to see or do in their entirety?

Here are two vignettes of how Toni and I have tried to used “Cooking Show CS” in 1 hour conference sessions.

Side Note: We don’t think that this pedagogy is always effective or that it is necessarily the best approach in all instances. Rather, we contend that there are times (i.e. short conference sessions) where it might meet a need—allowing participants to “develop” (or co-develop) a program in one hour that otherwise might take them much longer.

Guess My Number

In this particular session, new-to-CS learners were learning about introductory CS control structures, including sequential, branching, and iterative pathways. Participant pairs worked together to make sense of block-based pseudocode for this particular program, then we collectively translated this pseudocode into the text-based language of the TI-84+CE (by hand — more on that decision later). (Toni or I will share more about the block-based pseudocode we used for this activity in a later post.)

We ended up with the following program coded by hand on paper:

:Disp “GUESS IS TOO HIGH”
:Wait 0.5
:Send(“SET SOUND 1046.5 TIME 0.5”)
:Wait 0.6
:
:Disp “GUESS IS TOO LOW”
:Wait 0.5
:Send(“SET SOUND 65.41 TIME 0.5”)
:Wait 0.6
:
:randInt(1,20)→N
:
:Input “GUESS? “,G
:
:While N≠G
:
:If G<N
:Then
:Send(“SET SOUND 65.41 TIME 0.5”)
:Wait 0.6
:
:Else
:Send(“SET SOUND 1046.5 TIME 0.5”)
:Wait 0.6
:End
:
:Input “GUESS? ”,G
:
:End
:
:Disp “YOU WIN!”

Getting to this point took time, as we carefully constructed, deconstructed, and discussed the various computer science principles at play in our program. How were we possibly going to have time to code this program into the calculators, as well?

Here’s where “Cooking Show CS” came into play.

Toni and I created a partially pre-made version of the program (called NUMGAME) and uploaded it onto all of the handhelds in the room. Instead of starting from scratch, participants opened up NUMGAME to find the first 9 lines of code already coded into the program—specifically, the lines highlighted below:

We helped participants navigate through entering the remaining lines of code into the “pre-prepped” program. Most participants finished coding these commands into their handhelds in time to test and run their programs, but a few did not.

We had considered this possibility, so we also preloaded a program called NUMGAME2 onto all of the handheld calculators. This program included all of the lines of code we (as a group) had collectively coded by hand.

This, to us, was akin to the moment in a cooking show where the chef puts a “raw” dish in the oven, but then a few minutes later pulls out a “finished” dish that had already been cooking for the full amount of time. Our choice here was purposeful: We wanted all participants to experience success with the program that they had helped write, even if they didn’t have time to “type in” each line of the code.

We included two additional “pre-cooked” programs for participants to consider, as well—NUMGAME3, which added in additional context for the user, visual (LED) outputs, and a celebratory tone when the user guessed the correct number; and, NUMGAME4, which abstracted the program so the user determined the upper bound on the range of possible numbers and also included a counter that tracked and displayed the number of guesses the user needed to guess the number. Participants were given a few minutes to run each of these programs and then predict what the changes in the code might look like in order to result in these “enhanced” versions of the program.

Respect the Beep

Toni has written here about the “Respect the Beep” session we have led where we use the TI-Innovator and the Ultrasonic Ranger to model a vehicle’s back-up sensor. I discussed this same program (but through a pedagogical lens) in this post about Introducing CS with Flowcharts.

When we led this activity in a conference session earlier this summer, we had a sequence of three programs we were planning to write as a collective group.

Here is the finished code that we wanted to arrive at for the first program:

Toni and I decided to create and provide participants with a pre-made file with the following parts of the program already “cooked”:

Including these commands allowed us to: save a few minutes of coding time in the conference session; and, focus primarily on the theory and syntax of sending and receiving commands from the Ranger, rather than just the digital connections.

Wrapping a While loop around the data collection part of this program doesn’t take a lot of extra time, so that’s something we had participants do themselves, as well, resulting in a program of:

P.S. Highlighting text using the Shift button and then inserting a While…EndWhile loop from the Menu will insert the While loop around the highlighted text. Here’s a little GIF showing this tip:


However, we did run out of time for participants to code in the final branching structures that were to be housed inside the While loop. Here was our end goal:

How might we have used another “Cooking Show CS” program here to help us meet our instructional goal in the short amount of time we had with these learners? Toni and I have considered using an “almost done” version of the file that looks like this:

where participants would fill in the output commands (represented above by the highlighted blank lines) within the various branches of the program.

What are your thoughts? How might using a “cooking show” approach for a CS lesson/activity/presentation allow us to focus more on our CS instructional goal and less on aspects that participants perhaps don’t need to see or do in their entirety?

Abstracting SET COLOR — and Connecting to Prior Learning

Have you ever had one of those learning experiences where you thought you knew something going in (and knew it pretty well)…but then someone looked at a problem/task/question in a different way…and their approach broadened and deepened your understanding of what you thought you “knew”…? Those are some of my favourite learning experiences! Where I add connections and understanding to my knowledge by learning from others who think differently and/or who approached a task in a different way.

Here’s an example of just such a learning experience where a fellow educator recently deepened and broadened my understanding of the SET COLOR command on the TI-Innovator.

First, some background. Earlier this month, during a Teaching Computer Science with TI-Nspire workshop, we spent lots of time exploring different data types (including strings, floats, ints, etc.) and working with input and output commands related to these data types.

We learned how to Display output to the program’s user, including output made of different data types such as in the hypotenuse program shown below:

Running the hypotenuse program with actual parameters of 3 and 4 yields:

We informally called this use of the comma (,) in the Disp command concatenation, but then we were challenged to think more deeply about our use of this term later on. For now, we realized that the Disp command had syntax of:

Disp __, __, __, …

where any given blank could contain a string (in quotes) or a variable (string variable or numeric variable).

We later realized that the comma wasn’t our only (or even best?) way to concatenate, as we discovered when we ran into a program like this:

In this case, with the Request statement, we couldn’t use the comma to “concatenate” as we had done before with the Disp statement. We realized that this was due to the syntax of the Request statement, which looks something like this:

Request “[message to user]”,variable_to_store_response

The comma wouldn’t work to “concatenate”/connect output together here, since the Request statement was only expecting one comma in its syntax. (Side note: Request can actually receive a second comma followed by a 0 to suppress the user input, but that’s another story…! :))

Instead, we used the ampersand (&) to concatenate within the Request statement shown above.

From there, we wondered whether the comma (,) really had been concatenating for us earlier. We set off to investigate this further.

What do you think the output of this program would be?

Notice how the numeric variable age displays without a problem when using the comma (,) to separate Disp elements, but must be converted into a string (using the string() command) in order to be displayed using the ampersand (&) for concatenation. We had many interesting discussions about these details…!

Here is the output from running this program:

Notice anything interesting…?

We noticed some spacing issues. Namely, that the Disp __,__,__ approach inserted a space between each __ element, while the Disp [string]&[string]&[string] approach did not insert spaces between the various strings (as is true of typical concatenation).

Interesting… We were stretching our thinking and making connections about data types, output formatting, and concatenation methods.

Then, came this activity late in the second day…

We were learning how to code output to the RGB LED that is built into the TI-Innovator. We quickly learned that the syntax for sending colours to the RGB LED is:

Send “SET COLOR # # #”

where each of the three #’s is an integer from 0 to 255. We explored the effects of changing these numbers in order to determine what each of the three numbers controlled and how it controlled it.

Here is a screenshot of a program that turns on the red LED within the RGB LED at full intensity:

However, we had a problem. Our program, as currently written, wasn’t all that helpful. Specifically, our program coded only one particular colour — and if we wanted to display another colour, we had to go into the code for the program and make changes there. This wasn’t very user-friendly!

We decided to abstract our program so that the user could display whatever colour they wanted by entering three values for the red, green, and blue intensities.

For the sake of expediency in coding (at the sake of user-friendliness for users who didn’t write the program), we decided to pass these values into the program as formal parameters (i.e. via colour(r,g,b)). We updated our three colour intensity values in the Send “SET COLOR…” line with the variables that represented these colour intensities (r, g, and b)…and quickly figured out that our program didn’t work. Hmmm…

We had a great discussion about what was going on and going wrong here… Specifically, we were sending a string to the Innovator to be translated into visual output. The r, g, and b variables were being read as r, g, and b characters within the string — rather than reading the values these variables actually represented!

No worries, as I knew where this was going. (This is that “knew” thing I was talking about earlier…) I swooped in and saved the day by introducing the eval() command, which evaluates the value of the variable and pastes that into the Innovator string output/send command, instead. Our code now looked like this and worked as intended:

But then…the magic. Someone looked at this problem differently…

T, one of the participants in the room, piped up with “I found another way to do it…! An even more efficient way!” We pulled T’s screen up on the Navigator system and considered his code:

Discussion abounded.

“Wait — doesn’t Send “SET COLOR…” need three values in it?”

“Oh, he’s concatenating with the commas!”

“Don’t we need spaces between the numbers?”

“Could you use ampersands instead?”

“This is like how we used the Disp statement!”

“Wait — does that work?!”

I was surprised by T’s discovery (I had never seen this approach before!) and delighted (of course that works! How fun!). It was a wonderful moment of learning that cemented many ideas we had considered over the course of two days — and provided us with additional flexibility for coding a new command we were just learning to use.

What are your thoughts?

What might the value be in using syntax of Send “SET COLOR eval(r) eval(g) eval(b)” for a program like this?

What might the value be in using syntax of Send “SET COLOR ”,r,g,b ?

What does each method add to our coding arsenal and/or to our understanding of CS topics?

And…is there another way?

Introducing CS with Flowcharts

Toni and I have spent a lot of time over the past year thinking about pedagogical approaches that are effective for introducing CS topics to learners who are new to CS. Also, we’ve thought a lot about how to do this within relatively short learning episodes, such as a 60-minute conference presentation.

Our goal for the end of a 60-minute conference presentation is usually to have participants code out (on a calculator and also (usually) by hand) a rather complicated program — but, more importantly, to have made sense of said program.

In a recent conference session, our goal was for participants to code a program that modeled a back-up sensor on a car, complete with audio feedback based on how far the “car” was away from an object. This particular program (see Toni’s post here for more information) included sequential, branching, and iterative elements, as well as commands related to connecting to, collecting data from, and disconnecting from an actuator (or peripheral device). These are a lot of different elements for someone who is new to CS to integrate!

How might we design learning experiences to support sense-making around these varied commands/structures…in a way that is accessible for new-to-CS learners?

One approach that we have found particularly effective for this work is using flowcharts — specifically, using flowcharts that develop over time. Rather than just jumping right into this rather complicated flowchart (again, complicated for a new-to-CS learner!):

we instead provided the following blank flowchart and had participant pairs brainstorm what commands might need to go into this flowchart (and in what order) in order to read and display a distance measurement from an Ultrasonic Ranger attached to the Innovator.

Note that the task of collecting and displaying a distance measurement is not our end goal, which is to model a back-up sensor — but we deliberately wanted to decompose this program/situation into simpler situations first. In this case, before we model a full-on sensor, how might we code the Innovator just to collect and display a data measurement?

A quick debrief of ideas from the whole group (plus some information from us on what these commands look like for the Innovator) led to this filled-in flowchart:

With a completed flowchart, we quickly “translated” the pseudocode in this flowchart into the programming language of the TI-Nspire and TI-Innovator. Participants checked that their programs collected and displayed a valid distance measurement as intended.

Next, we asked participants to consider, What if we wanted to collect data measurements repeatedly, instead of just once? We provided the following blank flowchart and had participant pairs consider what commands might go in each element of the flowchart.

Participants talked through lots of important ideas here, including: What should go in the “decision diamond”? What commands should happen “outside” of the loop structure? What commands should happen again and again (i.e. inside the loop structure)?

Debriefing these ideas whole-group led to the following completed flowchart:

We quickly coded these additional commands/structures into the program we had started earlier and tested our new programs.

Now, our program collected distance measurements again and again until the distance was less than 0.01 meters. For the sake of our model, we said that this value represented the back-up sensor turning off after a collision — whoops! 🙂

However, our sensor wasn’t giving us very helpful feedback! It was displaying the distances, but who would be reading that display while backing up?! We wanted to add in audio feedback (beeps!) that alerted us if we were nearing an obstacle. Specifically, we wanted there to be two “levels” of audio feedback — warning beeps if we were nearing an object, but then a more urgent set of warning beeps when we got really close to an object.

We provided the following flowchart for participant pairs to discuss:

which led to a final debrief and this filled-in flowchart:

Here we were, finally, at our programmatic goal! We had collectively developed a program (in flowchart form and in coded form in our calculators) that modelled a back-up sensor.

Yes, it took a while to get there, but the time spent sense-making about the earlier situations and flowcharts helped participants develop and use appropriate CS structures and logic while creating this more complex program. We were thrilled with the engagement, discussions, and explanations from our participants, many of whom were new-to-CS learners!

Side Note: When leading this conference session, we ran out of time during the calculator coding of the final part of the program. 😦 We have discussed some time solutions for this for future presentations of this conference session including having participants code the first program on the calculator, but providing “almost complete” versions of parts 2 and 3 already on the calculator. This will cut time out of the session without losing any of the time that focuses on sense-making about the code.

To create these flowcharts we used the LucidCharts Diagrams Chrome extension, which allowed us to create and store these flowcharts in GoogleDrive.

Here’s a copy of our handout from the conference session; we wanted participants to leave with copies of the completed flowcharts so that they could later replicate this work on their own devices.

How else have you used flowcharts to introduce CS topics to new-to-CS learners? What other pedagogical or instructional approaches have been effective for making CS accessible to all?

Michelle Signature

Guest Post by Toni Norrell | Back-Up Sensor using the Ultrasonic Ranger

Another fantastic post from Toni Norrell (@ToniNorrell).

A friend of mine I’ll call Sandy drives a very fancy car! Her car has all the bells and whistles you might say. It has cameras/sensors all the way around that beep a lot. She has a tendency to ignore them when pulling in and out of parking spots because they beep when she is too close to the curb, they beep at the cars parked on either side, they beep if a car drives behind the car, etc. This particular day she ignored the beeps and backed right into a parked car! Like any good friend would, I made her a pillow that says “Respect the Beep.”

Michelle & I started thinking about how this incident could be modeled using the Ultrasonic Ranger & Innovator Hub. We wanted to write a program that was similar to a back-up sensor on a car. This expands upon my previous post about first collecting distance data from the ultrasonic ranger.


The program connects the ranger and uses the warm-up program that Michelle talked about in a previous post. The distance variable is initialized and a while loop is setup to read, get, and display the distance as long as it is more than .01 meters.

The If Then looks at distances between 0.1 and 0.5 and sets the hub to send a sound with a particular frequency if the ranger is within that distance.

When the “car” gets closer than 0.1, a higher frequency sound is heard.

We set both of these sounds inside For loops to provide more of the “pulse-like beeping” you often hear from a car’s back-up sensor.

Here is a copy of the complete TNS file for you to try! Also, here’s a short video clip of this program in action:

What other ways could this program have been written?
How could it run even more like a back-up sensor on a car?

Toni Signature

Warm-Up Program for Ranger (with TI-Innovator)

When the Ultrasonic Ranger is first used with the TI-Innovator (or used for the first time in awhile) its first few data measurements might be erroneous. (Toni discussed how to setup and code the Ranger to collect data measurements in this post.)

TI has created a document that outlines a short code segment that can be included in Ranger programs to allow the Ranger to “warm-up” and move through any possible erroneous data measurements. Here is some sample code for this “warm-up”:

Send “CONNECT RANGER 1 TO IN 1 ”

© Use While loop to “warm up” Ranger

d:=−1

While d=−1

Send “READ RANGER 1”

Get d

EndWhile

As Toni explained in this post, the Send “CONNECT RANGER 1 TO IN 1” line of code digitally connects the Ranger to the Innovator–naming the Ranger (in this case, RANGER 1) and telling the Innovator what port the Ranger is connected to (in this case, IN 1).

The While loop (with an initial value of d:=-1 so that the loop will be entered and will run at least once) acts as a “warm-up loop” of sorts that continues to collect and recollect distance measurements (READ from the Ranger and then stored to d) until the distance measurements coming back from the Ranger are positive distances.

Question: Should the code for this “warm-up loop” be explicitly included in all Ranger programs?

This is something Toni and I were thinking about recently when we were planning a 1 hour conference session that explored using the Ranger. We knew that the warm-up loop was an important segment of code to include — otherwise participants might see and be confused by “measured distances” of -1. However, we didn’t want participants–many of whom were completely new to Computer Science–to have to parse out this section of code as well as the rest of the program they would write. The “warm-up loop” was not the focus of our session, but seemed to be a necessary precursor–necessary to run in order to get accurate data; not necessary for participants to have to decipher (at this point).

Toni and I made the decision to write the warm-up block of code in as another program in the file and then call that program within the real program that we were building in the conference session. Here are two screenshots to illustrate the point:

Notice how the backup_sensor program (the program we were building and learning about in the conference session) was sent to participants pre-loaded with three “lines” of code — a line CONNECTing the Ranger, a method call for the warm-up program, and (later) a line DISCONNECTing the Ranger. The blank lines were for inserting the lines of code we developed as a group to code/model a back-up sensor (more on that in a later post).

One of the advantages of this approach? We didn’t lose time analyzing and reasoning through the While “warm-up loop”, but we still gained the benefit of having this warm-up loop running inside our program. This allowed us (as a group) to focus on the coding segments that were particularly relevant to our instructional goal.

One of the disadvantages of this approach? There was less transparency regarding what role the warm-up program was playing–how it worked, why it worked, why it was necessary, etc.. Also, since participants were not coding on their individual calculators, they didn’t leave with a copy of the warm-up program/code in case they wanted to use it later. One solution to this might be to distribute a copy of the document created by TI at the end of the session.

What do you think? What are the pros and cons of making the warm-up program explicit and/or “hiding” it instead? When might you make this code segment explicit? When might you “hide” it?

Michelle Signature

Guest Post by Toni Norrell | Getting Started with the Ultrasonic Ranger (with the Innovator Hub)

A great post from Math & Computer Science guru Toni Norrell (@ToniNorrell).

Michelle & I wanted to explore using the Ultrasonic Ranger with the Innovator Hub for a presentation we were putting together. We started off by focusing on the syntax needed to connect the ranger to collect a distance measurement. This consisted of several lines of code in the screenshot shown below.

Send “CONNECT RANGER 1 TO IN 1” is the initial code that connects the ranger (named RANGER 1) to the hub digitally. Physically, the ranger is connected in the port IN 1 on the side of the Innovator hub. The commands Send “CONNECT RANGER are found under the hub menu (Send “CONNECT -Input), TO is found in the hub menu under settings, and IN 1 is found under the hub menu and Ports.

Once the ranger is connected, we want to send a command to read this device called RANGER 1 using the command Send “READ RANGER 1” . The “READ” command tells the Ranger to “read” the distance at that particular instance in time. So far, we have connected the ranger, and read the ranger, but we haven’t done anything with that reading. Our next statement Get distance, will actually get the reading and then store it in a variable named distance. Of course, we won’t see this value unless we use the display command to show us the output: Disp distance. Note: The display command is not necessary for the data collection to work, however, it is a nice feature that allows us to get that visual check to see if our program is recording and saving distances.

It is good practice to use the last line of code which is Send “DISCONNECT RANGER 1” which is found under the hub menu. On the next post, Michelle will address the warm_up() statement in the code.

Here’s a short video showing this program in action. Also, you can download a copy of the TNS file for this short program.

Toni Signature